
It's now waiting time for the clear skies again. Next test will hopefully be the dark sky comparison between regular and modified cameras. Also some HA imaging is scheduled.
Here are two examples of the D5100 monochrome. Targets are relative bright, NGC7000 magnitude 4 and IC434 magnitude ~7. Both images are stacks of 4x600s / ISO800 through a 12 nm hydrogen alpha filter.
Back to the camera. There is heat and it’s best option to pump the heat out by an active cooling method. Remember, we don’t transfer cold but the heat and by removing heat we get cold.
For the transfer we need a heat bridge and copper is a good heat conducting material for that. Space inside the D5100 is limited so I recommend not to exceed 1mm thickness with the copper plate. It best to install plate so that it comes out from the bottom of the camera. It’s also necessary to insulate the copper plate as well as possible to prevent both moisture related and direct short circuit issues. It's easiest to attach copper into the sensor aluminum element with a heat conducting epoxy. If such is not available, then some electronically nonconducting paste like MX-4 could be used in the middle and a regular heavy duty epoxy bonding by the edges. This works just as good.
At this point you can choose whether to stay on the passive cooling or go to the active way. With the passive cooling with you can leave it be or just install a light weight cooling element and fan. If you decide go to active cooling way, then just install a peltier element between copper plate and cooling element.
You need to consider using a bit larger element with peltier element to dissipate all the heat though. Warmer the environment is, higher the peltier power and heat dissipation needs are. I’ve noticed that in my typical conditions around 0 °C I can run 6 amps peltier as ¼ power and still reach optimal -5 °C. Sensor doesn't generate that much heat afterall.

Part 2B - The actual imaging
Herra Kuulapaa
Astrophotography
Part 1: A slightly deeper level modification of your DSLR (11/2014)
If you are already familiar with my website you have most likely noticed it’s all about photography, and to be precise a bit different photography than most people do. Like one famous person once said few decades ago; we are not doing things because they’re easy, but because they’re hard. And this page is just about doing hard things, something that makes you feel like banging your head against the wall. These things and doing them are not for everyone but for certain people, who appreciate the journey perhaps more than the actual goal, some sadistic way perhaps but still. The thing I’m going to do next is just for such people.
Here is the project description of my Nikon D5100 monochrome and IR filter modification. In this project the IR-filter and sensor are removed from the camera. Sensor is then modified and reinserted into the camera. Same kind of mods have been done by many people before me so it's hardly anything new. Only my approach to it. Please be careful if following the instructions as removing the bayer-matrix is a very high risk process.
Digital camera sensors are interesting gadgets. They convert wavelengths of light to colorful pictures, but the sensors themselves are colorblind.
But how do they see in color you may ask? It’s all about RGB color filters called Bayer matrix in front of the individual grayscale pixels. A two by two block containing 1 red, 1 blue and 2 green pixels. These colors are then summed up, multiplied and averaged by fancy algorithms to make individual RGB-colour pixels. Because of the combining method we could say that camera guesses most of the pixel colors during debayering process. It has some drawbacks on image resolution (not physical resolution but separation of lines) but also on sensitivity due to the light absorption of the filters.
By getting rid of the RGB filters we gain some effective resolution and sensitivity from more evenly lit pixels but we do loose colors. During the process we also remove microlenses from the pixels so sensitivity is slightly reduced because of that. But summed up the effect should be increased sensitivity.
What the heck is the idea then? Making a fine working color camera monochrome and also losing precisely manufactured microlenses? Complete nonsense to a majority of photographers and I totally agree, but for a small group of people pointing their cameras to the black sky during the night it may still make sense.
But the stars are just small white light points and easily photographed? They are, but space is not a totally empty void. It’s relatively dusty and full of gasses, mostly hydrogen. I underline the relatively term though. Those nebulas made of gasses floating in space are interesting subjects for astrophotography.
Some of them simply reflect light from nearby stars but some have emission characteristics. Most important is the hydrogen emission called the alpha emission at 656nm. The wavelength means it’s deep in the red spectrum, right in the infrared neighborhood (starting from ~700nm). These nebulas have a dark reddish color when photographed in RGB and now're finally getting to the point when all this starts suddenly making sense.

So, we want to photograph hydrogen alpha emission and other sky things with our DSLR and we can do it. On my page you can see pictures of NGC 7000, which is a typical hydrogen nebula. But we can’t do that in a very effective way because of the sensor structure and the method how it captures red light. Remember, we only have ¼ of red pixels in our sensor. So only 25% of them are actually capturing red light in a relatively effective way (compared to other filters; blue and green. See the pictures above).
But it doesn’t stop there. Sensors are sensitive also to infrared light and that is visible in our pictures as white light, depending on white balance of course. The whole picture looks pinkish if one lets infrared to shine on the sensor, even with only ¼ of the red pixels. This is the reason why camera manufacturers block infrared from entering the sensor.
Red channel saturation is not really an issue so manufacturers use quite wide IR filters, which have gentle decreasing transmission towards infrared spectrum at 700nm. Gentle slope unfortunately means that transmission starts to decrease soon after 550nm and at 656nm there is only 30% left (Nikon rejects any information request on filters so this is just an approximation but it's in the neighborhood). Combine ¼ of red pixels and 30% emission and you realize why DSLR’s are not very effective capturing hydrogen alpha emission. There is a solution though and it requires steady hands, epoxy resin and screwdriver, a very small screwdriver.
Please be careful, practically everything you read below this point can potentially ruin your camera and trust me, there are loads of nonworking DSLR bodies because of this method.
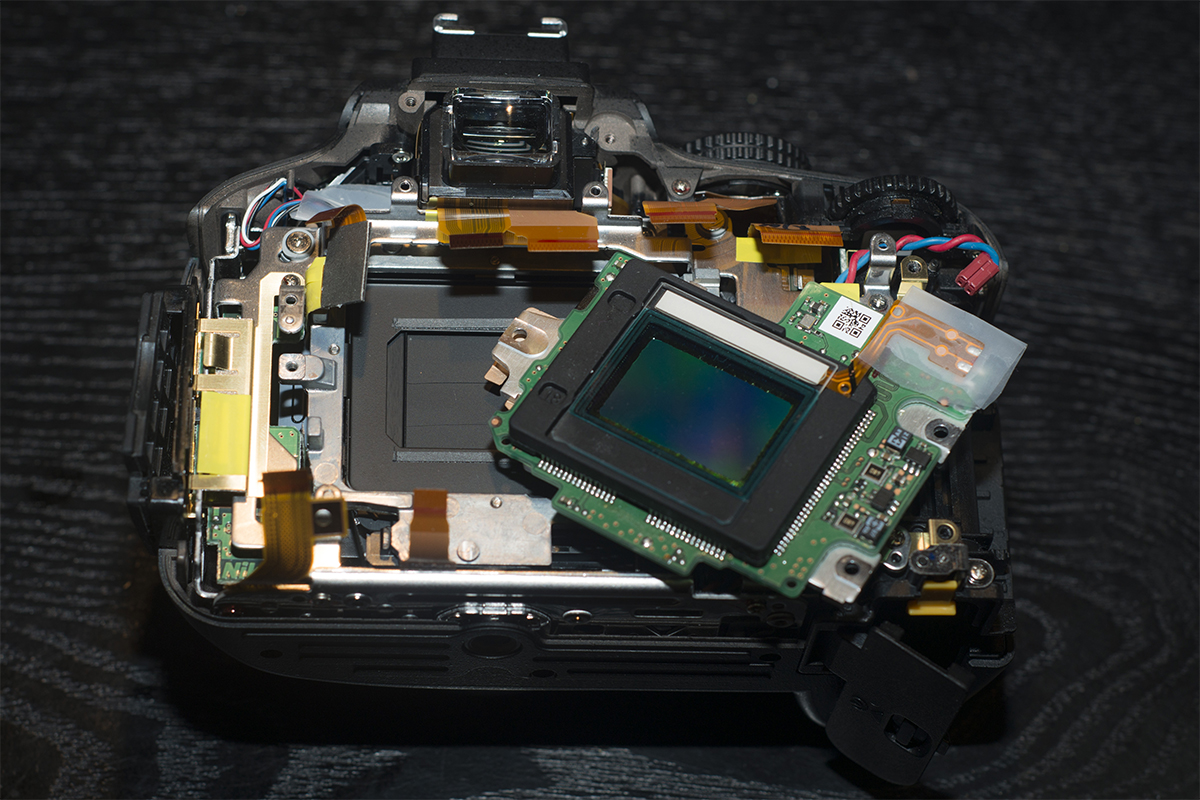

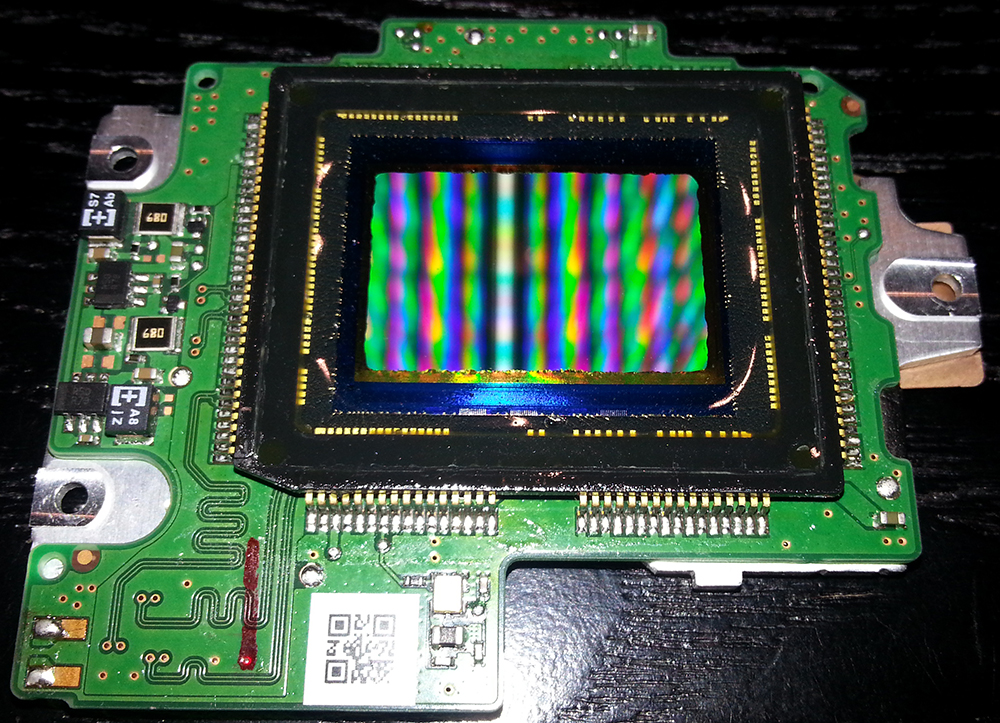
This is my Nikon D5100 sponsored to this cause by Mr Heikki Laaki. It has a 16mp Sony sensor and makes a good test subject. First the camera body needs to be disassembled. I won't explain how that can be done as there are plenty of instructions in web. For example you can go: www.ifixit.com
Please extra careful with the small connectors though. They are very easy to break.
The sensor and filter can be removed in one single packet in most of the cases. Some models have sensor cleaning function in the filter but some have it in a separate transparent glass. There is a small piezo element in the filter that vibrates dust of the glass. This is also the reason why filter is seated on rubber in the Nikon D5100. Piezo-connectors need to be desoldered before continuing.
This is for you if you are worried that cleaning your "sensor" will damage your pixels. No, you can't damage the sensor while cleaning the filter glass. We will get there but there is still another glass between us and the pixel grid. Just swab your "sensor" clean if it has any dust.
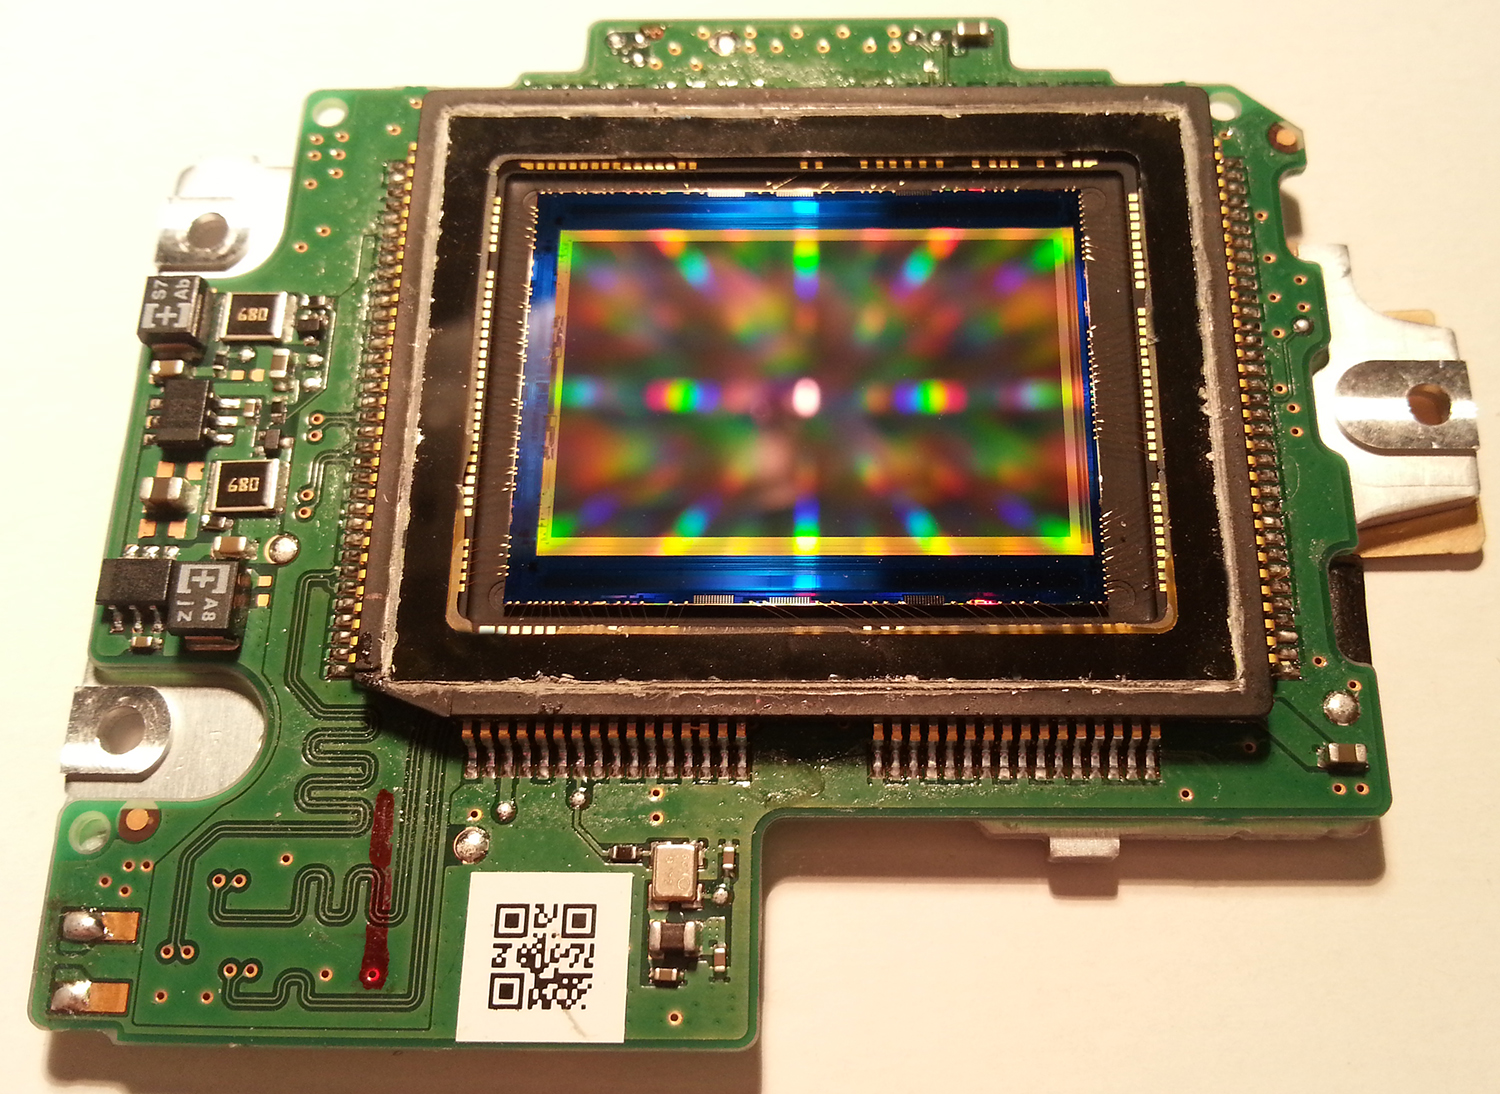
After removing the IR-filter glass we have the sensor fully visible. At this point it's a good idea to study it. Don't worry, you really can't damage it yet because it still has one glass surface protecting the delicate internal parts.
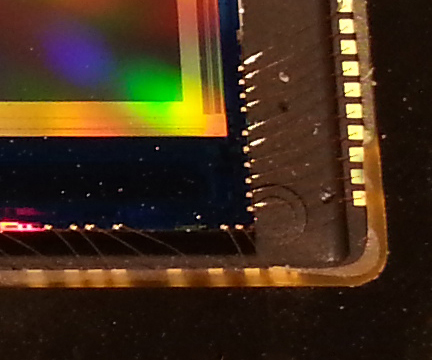
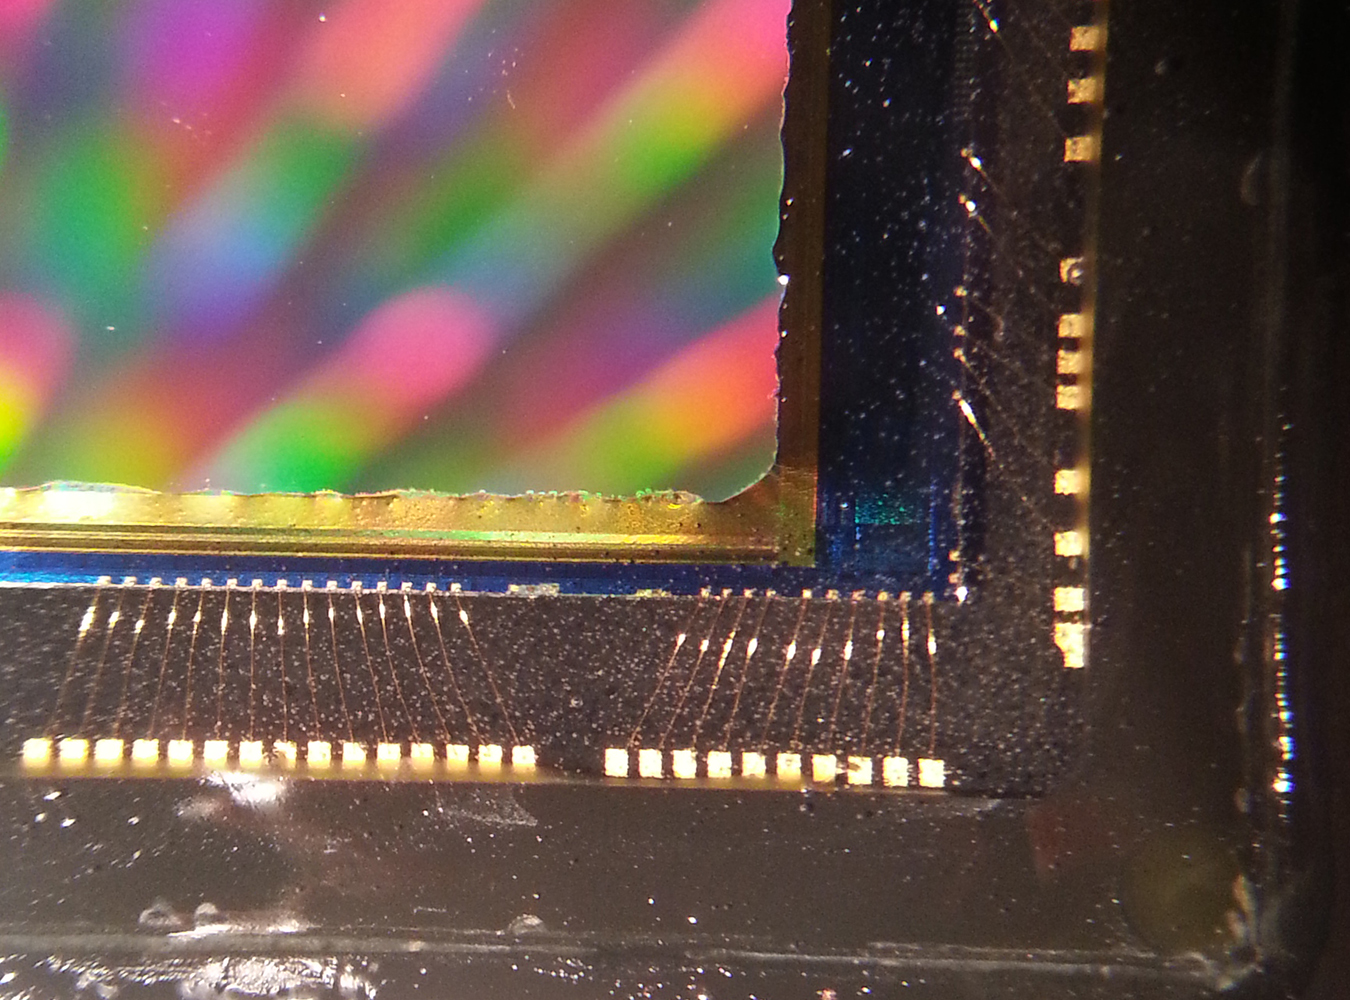
See the gold wires? They run all around the sensor chip and connect it to sensor frame connectors. Those wires are really sensitive and practically the only thing you can't damage them with is just looking at them - but don't stare too long. What I mean is that they can't take a anykind hit of anything at all. Disrupt one of them and you have your sensor done for good. So take extra care not to touch them. Got it? Good!
Sensor surface has so called microlenses above the Bayer matrix (RGB-filters) and as we're going to remove them it really doesn't matter if you gently touch it after the cover glass is off. But don't scrape it with anything hard.
Ready to go? Take a hot soldering iron or small blow torch and start point heating the sensor glass edges. Your mission is to point heat resin between cover glass over its release point. Few seconds at time and let it cool down little bit in between. The whole chip shouldn't be so hot that you cannot hold it with your bare fingers. Manufacturers use different resins and the release temperature is different between them. But start slowly and don't overheat the sensor.
You know you have applied enough heat when you see the resin color change to white/grey. Move along the edges until you have your whole sensor glass covered. Use a surgical knife or equivalent to pry the glass off the sensor. Note that you need to work in very small steps, few millimeters at time to avoid the cover glass shattering, which you really don't want to happen.
If your cover glass still shatters no matter how much you wish against it, then be extra careful not to let any glass pieces fall on those gold wires. And especially don't pry so hard that your knife slips cutting whole bunch of the wires off. This is a very delicate and neck hurting procedure so take your time rather than pushing on with force.
If everything went fine you now have a still working sensor without cover glass in front of you. From now on you need to be even more careful than before. I can't emphasize enough the sensitivity of the gold wiring. The next task is to decide how you wish to proceed. There are two different methods getting the Bayer matrix off the sensor: Scraping and polishing. First method can be done with great care and risk without protecting the gold wiring.The polishing approach needs resin protection covering the wiring before you can start working the sensor surface. I prefer the polishing so next job is to lay a resin coating.
You need to be very careful with the resin, once again. You have two things to worry. To keep the gold wires intact and to not let too much resin get on the pixel grid. Overall it's safer to sacrifice some pixels under the resin than risk damaging wiring running in golden frame during the polishing phase. But it's your choice in the end.
Pick a very fine polishing substance (semi liquid works best) and start gently polishing the sensor surface. Use a cotton bud or some other soft material. Try not to use too much pressure. Polish the surface 5 min at the time and clean polishing substance off to inspect the sensor. Slowly you'll see that the microlenses and color filters start to come off. Put the sensor back in the camera and inspect the results from your monitor every now and then.
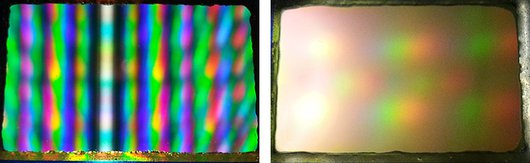
Sensor surface changes after you have cleared the microlenses and color filters. It looks now more opaque. When you're happy, clean the sensor and mount it back in camera.
If you are lucky it still works! Note that your camera now sees both UV and IR much further than non-modified one. For astrophotography you would most likely wish to insert a filter to cut off the IR light roughly from 700nm.
Part 1 B - The modified camera
Ok, now the camera has been modified. The one I'm using in the following tests has no IR filter on it. Everything you see on the back screen is deep red. If you open a picture taken with such a camera with regular RAW editor you get same red screen. This is because the camera doesn't know it's any different than before and now there is a lot more "red light" getting onto the sensor.
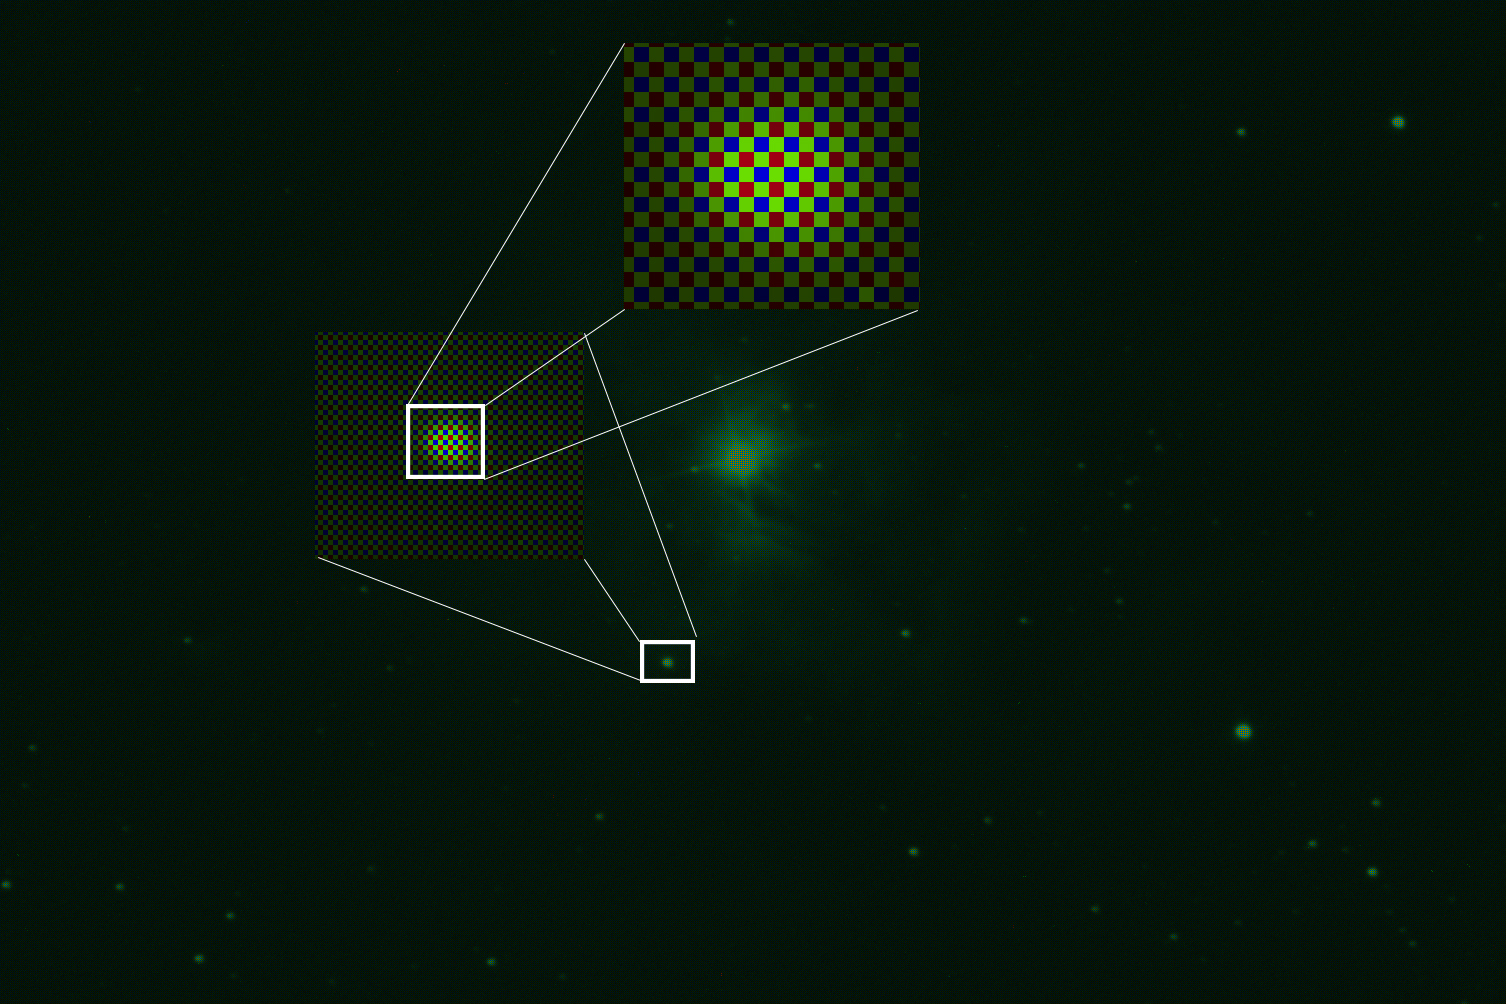
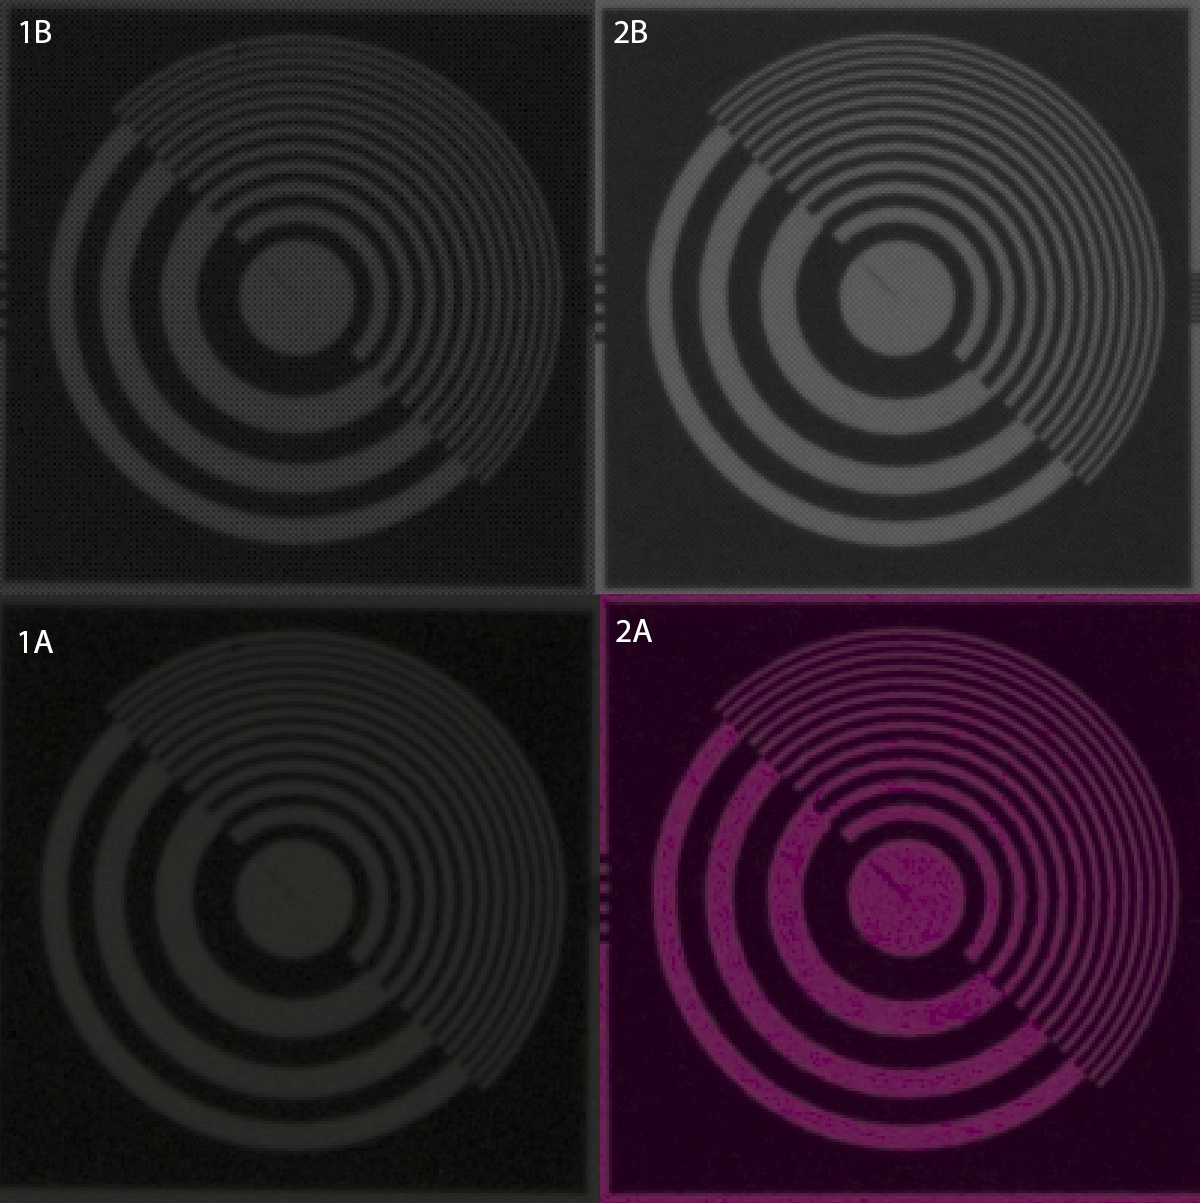
Instead of using a regular raw converted we need to open the images without debayering. That way the software doesn't calculate color pixels but instead it presents the whole picture in grayscale pixels with certain luminance. Below are four images. Pair 1 is regular D5100 sensor with IR filter and pair 2 is modified D5100 without RGB matrix or IR filter.
1A picture has been opened by Photoshop raw editor debayering process. 1B has been opened by Pixinsight without any debayering. Note that the red pixels are very dark in the non-debayered image. When those RGB-pixels are calculated, that low exposure of red pixels will affect the total luminosity of the color pixels.
2A is the modified sensor without the IR filter opened in Photoshop raw editor. You can tell this by the overall red color. Also the pixels are not what they really are, because of the debayering. What is different to 1A though is that in the picture the virtual red pixels are also evenly lit (I say virtual because there are no red filters left). Compare the sharpness and noise to 1A.
2B is the modified sensor without IR filter opened in Pixinsight without debayering. It has all the pixel data unchanged. Although it looks slightly noisier it is actually the best type of source data for astrophotography of all these four examples.
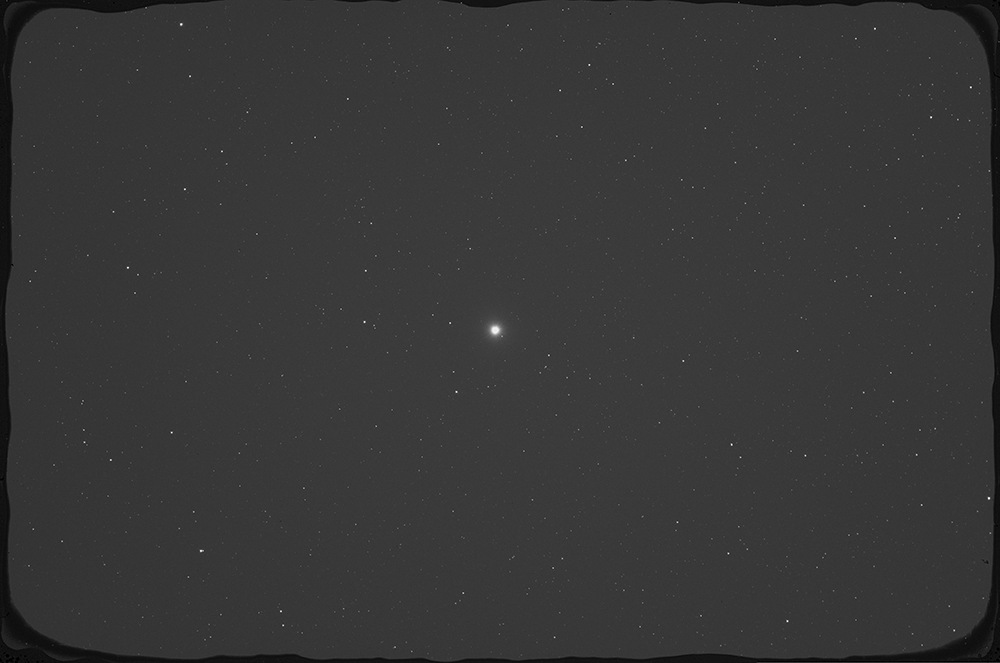
Below you can see a grayscale sample taken with the modified camera.
Part 1 C - The pixel pattern and getting rid of it
Yesterday the sky finally cleared and I was able to take some test shots. The original plan was to compare unmodified camera to mono modified but the fogging was so severe that I had to adjust my plan. To be honest I did the photo session with such hurry I forgot to adjust the focus when I changed camera bodies.
Naturally there is a focus distance difference between sensor with and without an IR filter and my five frame unmodified data set was shot out of focus. But the lens was fogged anyway so data was doomed to begin with. I managed to get a very interesting data with mono modified sensor and two different firmware modifications so the evening was success afterall.
The sky color was practically brown and there was a icing fog floating in the air. I used IDAS LPS P2 to block the light pollution. Exposure was 5 minutes with ISO800 at f/6.5. I also tried California nebula (NGC 1499) but conditions were simply not good enough for it (background was too light).
So instead of making a comparison between regular and modified sensors, the test focus was shifted to firmware tweaks provided by Nikon Hacker. This was actually far more interesting at this point than the other comparisons. Below is a four picture series explaining why. In the first picture from left is a original firmware exposure. You can see the same checker board pattern in it like previously. So far I have been in impression that this pattern is the result of some structural remains on the sensor surface. These small differences then make those luminosity changes between pixels, or at least I have thought so. But this test shows I was wrong.
The second picture is a exposure with so called True dark current patched firmware. This firmware patch disables all the data modifications on RAW level. I was very surprised to see that the checker board pattern was gone when I opened files as non debayered grayscale. This means that it is not the modification doing those patterns afterall, but instead a software alteration to data. Apparently it is the pixel value multiplication applied to blue and red pixels to compensate two green ones. Anyhow as good as it works in terrestrial photography, it surely is not the optimal method for monochromatic sensor in astrophotography. Thanks to the patch the camera will now provide totally unaltered raw data, which is very essential in astrophotography.
Next logical question is then how much does the original firmware pixel pattern affect the image quality? The second picture from right shows the averaged stack result of five checker board images. Pattern has been averaged out in it. Although we can get rid of the pixel pattern by stacking, the pixel multiplication may change the potential dwell depth resulting a clipping image with bright objects. More investigation is needed in this though.
The last image (first from right) is the stack of five true dark current modified images. This is just serving as a reference image to other stack. There is hardly any difference under these sky conditions. More exposures under dark skies are needed then.
Part 1 D - Proper astro imaging


You have now reached the end of the Nikon D5100 monochrome modifying project so it's time for final words.
Nikon D5100 is a good camera for terrestrial photography. it is also a very potent body for astrophotography as a default but with with certain modifications it can be much more. It has no banding issues and it has low dark current with DX-size sensor so the monochromatic D5100 makes a great value astrophotography tool. Modification takes time and effort and it certainly holds a risk to break the sensor or some other parts of the camera, but it totally makes sense when you see the results.
Part 2: Full narrow band astroimaging with monochrome D5100 DSLR (3/2015)
Hi again!
After I got the Nikon D5100 monochrome modification done and the test shots taken, I began to consider a possibility of taking this project further to a next logical level: The full narrow band imaging and false color RGB images. I already had that H-alfa filter, so I only had to order additional O-III and S-II filters. The total cost of the three narrow band filters rose a bit high compared to the camera and scope I’m using in this project though. But it totally made sense after coming this far.
The drive towards narrow bands was not the only reason. I’m having some background reasons to move towards full narrow banding, the light pollution ones to be precise. I’m imaging mostly near Helsinki, which is the capital of Finland, so the light pollution is strong for normal RGB imaging.
Nikon D5100 was not built to be a pro camera and this shows in connectivity. It doesn’t support long bulb exposures through the USB and an additional serial cable solution needs to be used. A good thing is that a simple USB relay can be used in bulb. I’m using BackyardNikon, which is a astrophotography program from O’Telescope. BackyardNikon supports the serial cable and USB relay bulb imaging. It also gives the dithering commands to PhD so it practically eliminates the need of manual work during the exposure sequences. Previously I had to manually trigger the exposures and dithering, but now I can sit cosy inside while my setup takes the pictures.
One practical issue still remained though and that is the heat. The largest and most meaningful heat source what comes to the noise in the camera is the sensor itself. Sensors usually have small passive cooling elements, but the main issue with them is that the heat builds up inside the camera and transfers out only passive way. The passive heat transfer is not a effective way because the camera bodies tend to be tightly closed units. Luckily the heat generation is small, but nevertheless the heat tends to build up inside the camera. The temperature difference between sensor and the outside of course helps eventually to cool the sensor, but it really doesn’t make the much difference unless one is imaging already in freezing conditions.


In the left graph we can see how the sensor temperature gradually increases during the continuous exposures (ISO1600/10min) in Nikon D5100 body. The effect applies to all DSLR cameras. Vertical axis is the temperature in Celsius and horizontal axis is the time in minutes. We can see in the graph that the sensor temperature slowly rises approx +12 °C above the outside temperature. What does the heat then mean in real life?
Graph on the right is the temperature/noise comparison and in that it can be clearly seen what the sensor temperature means noise wise (noise was analyzed with Pixinsight noise evaluation tool and temperature was measured from the sensor frame with a low mass precision temperature sensor).
Graph shows that the noise increases when the sensor temperature rise. The optimal low noise level is reached when sensor temperature goes below the freezing conditions. Some of the astrophotographers on the high latitudes may sometimes have optimal conditions to meet that camera internal temperature, but it requires long cool down time and -20 °C conditions. However those temperatures are not common even where I live and they tend to create some photographer related adverse effects.

Is it worth it then? Yes, it is!
On the right is a D5100 grayscale comparison dark frame taken with ISO1600 and 10 minutes exposure time against the cap. Thermal noise can be reduced to minimum by cooling sensor to freezing conditions. Click the image larger to see the fine noise better.
There is a clear intensivity difference between emissions of Ha, O-III and S-II: Ha signal is many times stronger than O-III or S-II. I first started with ISO1600/10 min exposures with Ha, but soon discovered that I needed to increase it to 15 minutes when exposing with O-III and S-II. And still the signal could have been stronger. There is also a difference between O-III and S-II background lightness. I tend to get higher background level with O-III. The ISO1600/15 min exposures however seem to be rather good single solution in my setup.

I used the 15 min sub exposures when took sub exposures of the Rosette nebula, which is a bright emission nebula (magnitude 5.5) in Monoceros. The image above has total combined exposure time of 8 hours, mostly in Ha, ISO1600 and sensor cooled to -7 °C. Ha has been mixed in O-III and S-II channels, which makes the pale dusty look and reduces the overall saturation. Picture has been processed in Pixinsight.
So, the DSLR narrowbanding seem to work very well and I must admit I’m really happy with the results. Of course a monochrome DSLR cannot ever fully match the cooled CCD-astrocameras, but it can come surprisingly close. Relatively big sensor and high resolution helps too. The Rosette Nebula above gives you some taste of the performance :)
Copyright 2015 © All Rights Reserved by Herra Kuulapaa